以太网驱动的流程浅析(五)-mii_bus初始化以及phy id的获取
作者:heaven 发布于:2020-1-7 14:42 分类:Linux内核分析
我们继续沿着上一篇的以太网思路来继续分析,目的是为了学习以太网这块从应用层到底层的整块加载和匹配流程。
如下是本人调试过程中的一点经验分享,以太网驱动架构毕竟涉及的东西太多,如下仅仅是针对加载流程和围绕这个问题产生的分析过程和驱动加载流程部分,并不涉及以太网协议层的数据流程分析。
【硬件环境】 Imx6ul
【Linux kernel版本】 Linux4.1.15
【以太网phy】 Realtek8201f
1.1 mii_bus初始化以及phy id的获取
然后进行mii的一些初始化fec_enet_mii_init(pdev);
主要是对struct mii_bus这里的成员进行初始化
/*
 * The Bus class for PHYs.  Devices which provide access to
 * PHYs should register using this structure
 */
struct mii_bus {
	const char *name;
	char id[MII_BUS_ID_SIZE];
	void *priv;
	int (*read)(struct mii_bus *bus, int phy_id, int regnum);
	int (*write)(struct mii_bus *bus, int phy_id, int regnum, u16 val);
	int (*reset)(struct mii_bus *bus);

	/*
	 * A lock to ensure that only one thing can read/write
	 * the MDIO bus at a time
	 */
	struct mutex mdio_lock;

	struct device *parent;
	enum {
		MDIOBUS_ALLOCATED = 1,
		MDIOBUS_REGISTERED,
		MDIOBUS_UNREGISTERED,
		MDIOBUS_RELEASED,
	} state;
	struct device dev;

	/* list of all PHYs on bus */
	struct phy_device *phy_map[PHY_MAX_ADDR];

	/* PHY addresses to be ignored when probing */
	u32 phy_mask;

	/*
	 * Pointer to an array of interrupts, each PHY's
	 * interrupt at the index matching its address
	 */
	int *irq;
};
#define to_mii_bus(d) container_of(d, struct mii_bus, dev)
	fep->mii_bus = mdiobus_alloc();
	if (fep->mii_bus == NULL) {
		err = -ENOMEM;
		goto err_out;
	}

	fep->mii_bus->name = "fec_enet_mii_bus";
	fep->mii_bus->read = fec_enet_mdio_read;
	fep->mii_bus->write = fec_enet_mdio_write;
	snprintf(fep->mii_bus->id, MII_BUS_ID_SIZE, "%s-%x",
		pdev->name, fep->dev_id + 1);
	fep->mii_bus->priv = fep;
	fep->mii_bus->parent = &pdev->dev;

	fep->mii_bus->irq = kmalloc(sizeof(int) * PHY_MAX_ADDR, GFP_KERNEL);
	if (!fep->mii_bus->irq) {
		err = -ENOMEM;
		goto err_out_free_mdiobus;
	}

	for (i = 0; i < PHY_MAX_ADDR; i++)
		fep->mii_bus->irq[i] = PHY_POLL;
并且会做注册mdiobus的工作
	node = of_get_child_by_name(pdev->dev.of_node, "mdio");
	if (node) {
		err = of_mdiobus_register(fep->mii_bus, node);
		of_node_put(node);
	} else {
		err = mdiobus_register(fep->mii_bus);
	}
因为我们系统是使用device tree,因此会执行of_mdiobus_register
/**
 * of_mdiobus_register - Register mii_bus and create PHYs from the device tree
 * @mdio: pointer to mii_bus structure
 * @np: pointer to device_node of MDIO bus.
 *
 * This function registers the mii_bus structure and registers a phy_device
 * for each child node of @np.
 */
int of_mdiobus_register(struct mii_bus *mdio, struct device_node *np)
{
	struct device_node *child;
	const __be32 *paddr;
	bool scanphys = false;
	int addr, rc, i;

	/* Mask out all PHYs from auto probing.  Instead the PHYs listed in
	 * the device tree are populated after the bus has been registered */
	mdio->phy_mask = ~0;

	/* Clear all the IRQ properties */
	if (mdio->irq)
		for (i=0; i<PHY_MAX_ADDR; i++)
			mdio->irq[i] = PHY_POLL;

	mdio->dev.of_node = np;

	/* Register the MDIO bus */
	rc = mdiobus_register(mdio);
	if (rc)
		return rc;

	/* Loop over the child nodes and register a phy_device for each one */
	for_each_available_child_of_node(np, child) {
		addr = of_mdio_parse_addr(&mdio->dev, child);
		if (addr < 0) {
			scanphys = true;
			continue;
		}

		rc = of_mdiobus_register_phy(mdio, child, addr);
		if (rc)
			continue;
	}

	if (!scanphys)
		return 0;

	/* auto scan for PHYs with empty reg property */
	for_each_available_child_of_node(np, child) {
		/* Skip PHYs with reg property set */
		paddr = of_get_property(child, "reg", NULL);
		if (paddr)
			continue;

		for (addr = 0; addr < PHY_MAX_ADDR; addr++) {
			/* skip already registered PHYs */
			if (mdio->phy_map[addr])
				continue;

			/* be noisy to encourage people to set reg property */
			dev_info(&mdio->dev, "scan phy %s at address %i\n",
				 child->name, addr);

			rc = of_mdiobus_register_phy(mdio, child, addr);
			if (rc)
				continue;
		}
	}

	return 0;
}
EXPORT_SYMBOL(of_mdiobus_register);
进行midobus_register
	/* Register the MDIO bus */
	rc = mdiobus_register(mdio);
	if (rc)
		return rc;

	/* Loop over the child nodes and register a phy_device for each one */
	for_each_available_child_of_node(np, child) {
		addr = of_mdio_parse_addr(&mdio->dev, child);
		if (addr < 0) {
			scanphys = true;
			continue;
		}

		rc = of_mdiobus_register_phy(mdio, child, addr);
		if (rc)
			continue;
	}
由于设备树代码是这样的:
	mdio {
		#address-cells = <1>;
		#size-cells = <0>;

		ethphy0: ethernet-phy@1 {
			compatible = "ethernet-phy-ieee802.3-c22";
			reg = <0>;
		};
	};
如下路径:drivers/of/of_mdio.c
static int of_mdiobus_register_phy(struct mii_bus *mdio, struct device_node *child,
				   u32 addr)
{
	struct phy_device *phy;
	bool is_c45;
	int rc;
	u32 phy_id;

	is_c45 = of_device_is_compatible(child,
					 "ethernet-phy-ieee802.3-c45");

	if (!is_c45 && !of_get_phy_id(child, &phy_id))
		phy = phy_device_create(mdio, addr, phy_id, 0, NULL);
	else
		phy = get_phy_device(mdio, addr, is_c45);
	if (!phy || IS_ERR(phy))
		return 1;

	rc = irq_of_parse_and_map(child, 0);
	if (rc > 0) {
		phy->irq = rc;
		if (mdio->irq)
			mdio->irq[addr] = rc;
	} else {
		if (mdio->irq)
			phy->irq = mdio->irq[addr];
	}

	/* Associate the OF node with the device structure so it
	 * can be looked up later */
	of_node_get(child);
	phy->dev.of_node = child;

	/* All data is now stored in the phy struct;
	 * register it */
	rc = phy_device_register(phy);
	if (rc) {
		phy_device_free(phy);
		of_node_put(child);
		return 1;
	}

	dev_dbg(&mdio->dev, "registered phy %s at address %i\n",
		child->name, addr);

	return 0;
}
因此我们是走get_phy_device这个函数:
所以我说内核代码写的好,就是注释和函数名基本就是意思了,获取phy device,
/**
 * get_phy_device - reads the specified PHY device and returns its @phy_device
 *		    struct
 * @bus: the target MII bus
 * @addr: PHY address on the MII bus
 * @is_c45: If true the PHY uses the 802.3 clause 45 protocol
 *
 * Description: Reads the ID registers of the PHY at @addr on the
 *   @bus, then allocates and returns the phy_device to represent it.
 */
struct phy_device *get_phy_device(struct mii_bus *bus, int addr, bool is_c45)
{
	struct phy_c45_device_ids c45_ids = {0};
	u32 phy_id = 0;
	int r;

	r = get_phy_id(bus, addr, &phy_id, is_c45, &c45_ids);
	if (r)
		return ERR_PTR(r);

	/* If the phy_id is mostly Fs, there is no device there */
	if ((phy_id & 0x1fffffff) == 0x1fffffff)
		return NULL;

	return phy_device_create(bus, addr, phy_id, is_c45, &c45_ids);
}
EXPORT_SYMBOL(get_phy_device);
/**
 * get_phy_id - reads the specified addr for its ID.
 * @bus: the target MII bus
 * @addr: PHY address on the MII bus
 * @phy_id: where to store the ID retrieved.
 * @is_c45: If true the PHY uses the 802.3 clause 45 protocol
 * @c45_ids: where to store the c45 ID information.
 *
 * Description: In the case of a 802.3-c22 PHY, reads the ID registers
 *   of the PHY at @addr on the @bus, stores it in @phy_id and returns
 *   zero on success.
 *
 *   In the case of a 802.3-c45 PHY, get_phy_c45_ids() is invoked, and
 *   its return value is in turn returned.
 *
 */
static int get_phy_id(struct mii_bus *bus, int addr, u32 *phy_id,
		      bool is_c45, struct phy_c45_device_ids *c45_ids)
{
	int phy_reg;

	if (is_c45)
		return get_phy_c45_ids(bus, addr, phy_id, c45_ids);

	/* Grab the bits from PHYIR1, and put them in the upper half */
	phy_reg = mdiobus_read(bus, addr, MII_PHYSID1);
	if (phy_reg < 0)
		return -EIO;

	*phy_id = (phy_reg & 0xffff) << 16;

	/* Grab the bits from PHYIR2, and put them in the lower half */
	phy_reg = mdiobus_read(bus, addr, MII_PHYSID2);
	if (phy_reg < 0)
		return -EIO;

	*phy_id |= (phy_reg & 0xffff);

	return 0;
}
最关键的函数就是它,也就是本文的核心,这里是从寄存器中通过mdiobus的read方法来从phy中获取phy id,但是这里并没有获取到phy_id ,这寄存器都是以太网的通用寄存器
#define MII_PHYSID1 0x02 /* PHYS ID 1 */
#define MII_PHYSID2 0x03 /* PHYS ID 2 */
既然没有从寄存器中获取到phy_id,因此phy_device_create也不会在mii bus数据结构中创建phy_device,
那么应用层在进行socket的时候,回调了open函数 fec_enet_open,这个函数中的fec_enet_mii_probe就不会从of_phy_connect中获取到phy_device,因此就会出现-19的错误。那么获取不到phy_id的根本原因就是因为reset的时序没满足datasheet的要求,具体原因分析请见之前第一篇以太网分析的《标题2 原因分析》
1.2 Realtek phy的内核配置
那这是获取不到phy id的过程,那么正常的获取phy id的流程又是怎样的呢?
我们可以看到这样的log:
fec 2188000.ethernet eth0: Freescale FEC PHY driver [RTL8201F Fast Ethernet] (mii_bus:phy_addr=2188000.ethernet:00, irq=-1)
那这里又是怎样匹配的呢?
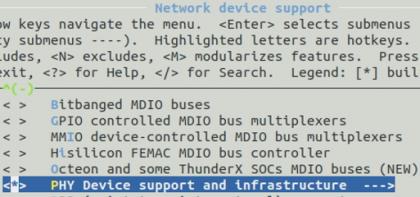
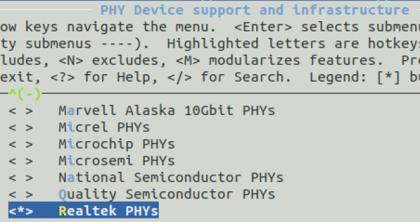
make kernel_menuconfig中我们需要选中realtek这款phy
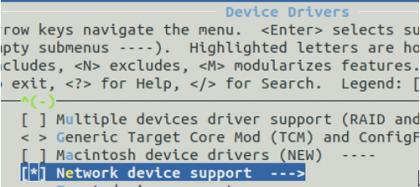
选中Realtek PHYs,这样realtek.c就可以编译到kernel了
代码路径:drivers/net/phy/realtek.c
static struct phy_driver realtek_drvs[] = {
	{
		.phy_id         = 0x00008201,
		.name           = "RTL8201CP Ethernet",
		.phy_id_mask    = 0x0000ffff,
		.features       = PHY_BASIC_FEATURES,
		.flags          = PHY_HAS_INTERRUPT,
		.config_aneg    = &genphy_config_aneg,
		.read_status    = &genphy_read_status,
		.driver         = { .owner = THIS_MODULE,},
	},{
		.phy_id		= 0x001cc816,
		.name		= "RTL8201F Fast Ethernet",
		.phy_id_mask	= 0x001fffff,
		.features	= PHY_BASIC_FEATURES,
		.flags		= PHY_HAS_INTERRUPT,
		.config_init	= rtl8201f_config_init,
		.config_aneg	= &genphy_config_aneg,
		.read_status	= &genphy_read_status,
		.ack_interrupt	= &rtl8201f_ack_interrupt,
		.config_intr	= &rtl8201f_config_intr,
		.set_wol		= rtl8201f_set_wol,
		.get_wol		= rtl8201f_get_wol,
		.suspend	= rtl8201f_suspend,
		.resume		= rtl8201f_resume,
		.driver		= { .owner = THIS_MODULE,},
	},{
		.phy_id		= 0x001cc912,
		.name		= "RTL8211B Gigabit Ethernet",
		.phy_id_mask	= 0x001fffff,
		.features	= PHY_GBIT_FEATURES,
		.flags		= PHY_HAS_INTERRUPT,
		.config_aneg	= &genphy_config_aneg,
		.read_status	= &genphy_read_status,
		.ack_interrupt	= &rtl821x_ack_interrupt,
		.config_intr	= &rtl8211b_config_intr,
		.driver		= { .owner = THIS_MODULE,},
	},{
		.phy_id		= 0x001cc915,
		.name		= "RTL8211E Gigabit Ethernet",
		.phy_id_mask	= 0x001fffff,
		.features	= PHY_GBIT_FEATURES,
		.flags		= PHY_HAS_INTERRUPT,
		.config_aneg	= &genphy_config_aneg,
		.read_status	= &genphy_read_status,
		.ack_interrupt	= &rtl821x_ack_interrupt,
		.config_intr	= &rtl8211e_config_intr,
		.suspend	= genphy_suspend,
		.resume		= genphy_resume,
		.driver		= { .owner = THIS_MODULE,},
	},
};

module_phy_driver(realtek_drvs);

static struct mdio_device_id __maybe_unused realtek_tbl[] = {
	{ 0x001cc816, 0x001fffff },
	{ 0x001cc912, 0x001fffff },
	{ 0x001cc915, 0x001fffff },
	{ }
};
phy_id = 0x001cc816我们需要把这个phy id填入
module_phy_driver(realtek_drvs);
/**
 * module_phy_driver() - Helper macro for registering PHY drivers
 * @__phy_drivers: array of PHY drivers to register
 *
 * Helper macro for PHY drivers which do not do anything special in module
 * init/exit. Each module may only use this macro once, and calling it
 * replaces module_init() and module_exit().
 */
#define phy_module_driver(__phy_drivers, __count)			\
static int __init phy_module_init(void)					\
{									\
	return phy_drivers_register(__phy_drivers, __count);		\
}									\
module_init(phy_module_init);						\
static void __exit phy_module_exit(void)				\
{									\
	phy_drivers_unregister(__phy_drivers, __count);			\
}									\
module_exit(phy_module_exit)

#define module_phy_driver(__phy_drivers)				\
	phy_module_driver(__phy_drivers, ARRAY_SIZE(__phy_drivers))
这里会将这个phy_drvier注册进去
/**
 * phy_probe - probe and init a PHY device
 * @dev: device to probe and init
 *
 * Description: Take care of setting up the phy_device structure,
 *   set the state to READY (the driver's init function should
 *   set it to STARTING if needed).
 */
static int phy_probe(struct device *dev)
{
	struct phy_device *phydev = to_phy_device(dev);
	struct device_driver *drv = phydev->dev.driver;
	struct phy_driver *phydrv = to_phy_driver(drv);
	int err = 0;

	phydev->drv = phydrv;
然后在这里把phy_device与phy_drvier关联了起来,再由phy_driver_register注册
int phy_drivers_register(struct phy_driver *new_driver, int n)
{
	int i, ret = 0;

	for (i = 0; i < n; i++) {
		ret = phy_driver_register(new_driver + i);
		if (ret) {
			while (i-- > 0)
				phy_driver_unregister(new_driver + i);
			break;
		}
	}
	return ret;
}
EXPORT_SYMBOL(phy_drivers_register);
Freescale的以太网控制器驱动fec_main.c中
static int fec_enet_mii_probe(struct net_device *ndev)
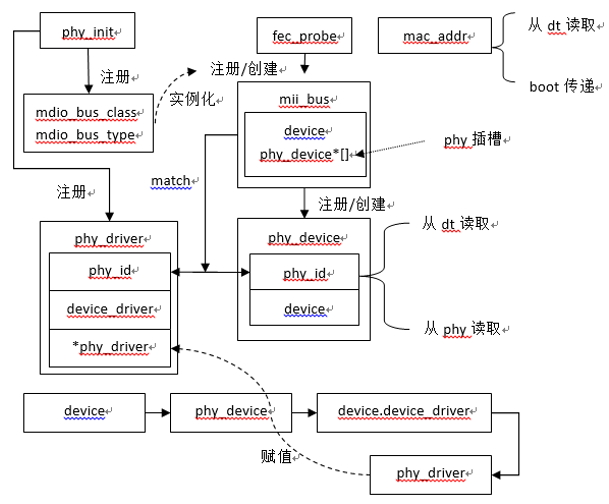
1.3 以太网流程总图
最后汇总一个图给大家:
以上五篇文章就是我个人的记录,如有表达不精准的地方或者理解不到位的地方可以多多交流指出,共同进步
1. 网址分享
http://stackoverflow.com/questions/5308090/set-ip-address-using-siocsifaddr-ioctl
https://lkml.org/lkml/2017/2/3/396
linux PHY驱动
http://www.latelee.org/programming-under-linux/linux-phy-driver.html
Linux PHY几个状态的跟踪
http://www.latelee.org/programming-under-linux/linux-phy-state.html
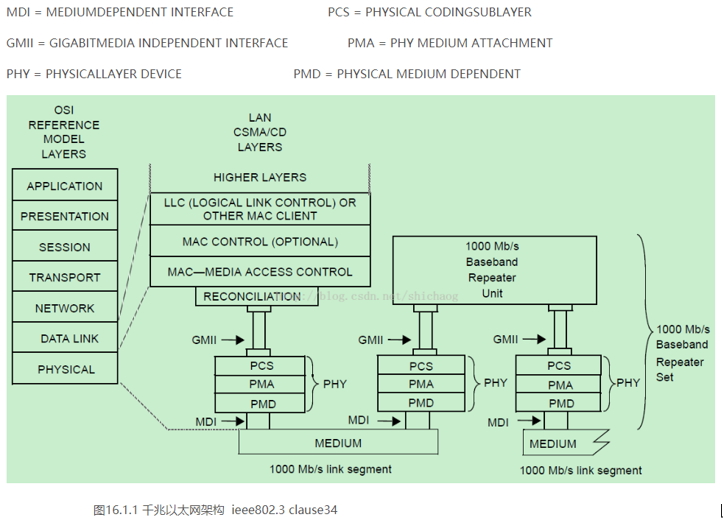
第十六章PHY -基于Linux3.10
https://blog.csdn.net/shichaog/article/details/44682931
功能
最新评论
文章分类
随机文章
文章存档
- 2025年4月(5)
- 2024年2月(1)
- 2023年5月(1)
- 2022年10月(1)
- 2022年8月(1)
- 2022年6月(1)
- 2022年5月(1)
- 2022年4月(2)
- 2022年2月(2)
- 2021年12月(1)
- 2021年11月(5)
- 2021年7月(1)
- 2021年6月(1)
- 2021年5月(3)
- 2020年3月(3)
- 2020年2月(2)
- 2020年1月(3)
- 2019年12月(3)
- 2019年5月(4)
- 2019年3月(1)
- 2019年1月(3)
- 2018年12月(2)
- 2018年11月(1)
- 2018年10月(2)
- 2018年8月(1)
- 2018年6月(1)
- 2018年5月(1)
- 2018年4月(7)
- 2018年2月(4)
- 2018年1月(5)
- 2017年12月(2)
- 2017年11月(2)
- 2017年10月(1)
- 2017年9月(5)
- 2017年8月(4)
- 2017年7月(4)
- 2017年6月(3)
- 2017年5月(3)
- 2017年4月(1)
- 2017年3月(8)
- 2017年2月(6)
- 2017年1月(5)
- 2016年12月(6)
- 2016年11月(11)
- 2016年10月(9)
- 2016年9月(6)
- 2016年8月(9)
- 2016年7月(5)
- 2016年6月(8)
- 2016年5月(8)
- 2016年4月(7)
- 2016年3月(5)
- 2016年2月(5)
- 2016年1月(6)
- 2015年12月(6)
- 2015年11月(9)
- 2015年10月(9)
- 2015年9月(4)
- 2015年8月(3)
- 2015年7月(7)
- 2015年6月(3)
- 2015年5月(6)
- 2015年4月(9)
- 2015年3月(9)
- 2015年2月(6)
- 2015年1月(6)
- 2014年12月(17)
- 2014年11月(8)
- 2014年10月(9)
- 2014年9月(7)
- 2014年8月(12)
- 2014年7月(6)
- 2014年6月(6)
- 2014年5月(9)
- 2014年4月(9)
- 2014年3月(7)
- 2014年2月(3)
- 2014年1月(4)





发表评论: