Device Tree(四):文件结构解析
作者:smcdef 发布于:2017-9-24 11:08 分类:统一设备模型
前言
通过linuxer发表的三篇设备树的文章,我想你应该对设备已经有一个非常充分的认识了。本篇文章即作为一篇Device Tree的总结性文章,同时也作为linuxer文章的补充。本篇文章曾发表在Linuxer公众号,链接为:
http://mp.weixin.qq.com/s/OX-aXd5MYlE_YoZ3p32qWA
1. Device Tree简介
设备树就是描述单板资源以及设备的一种文本文件。本篇文章主要是更深层次的探讨设备文件的构成以及kernel解析设备树的原理。所以,本篇内容并不是针对没有任何设备树知识的读者。本篇文章主要针对已经使用过设备树或者对设备已经有所了解并想深层次的探究设备树的文件结构和kernel解析过程的读者。
2. Device Tree编译
Device Tree文件的格式为dts,包含的头文件格式为dtsi,dts文件是一种人可以看懂的编码格式。但是uboot和linux不能直接识别,他们只能识别二进制文件,所以需要把dts文件编译成dtb文件。dtb文件是一种可以被kernel和uboot识别的二进制文件。把dts编译成dtb文件的工具是dtc。Linux源码目录下scripts/dtc目录包含dtc工具的源码。在Linux的scripts/dtc目录下除了提供dtc工具外,也可以自己安装dtc工具,linux下执行:sudo apt-get install device-tree-compiler安装dtc工具。dtc工具的使用方法是:dtc –I dts –O dtb –o xxx.dtb xxx.dts,即可生成dts文件对应的dtb文件了。 当然了,dtc –I dtb –O dts –o xxx.dts xxx.dtb反过来即可生成dts文件。其中还提供了一个fdtdump的工具,可以dump dtb文件,方便查看信息。
3. Device Tree头信息
fdtdump工具使用,Linux终端执行ftddump –h,输出以下信息:
fdtdump -h
Usage: fdtdump [options] <file>
Options: -[dshV]
-d, --debug Dump debug information while decoding the file
-s, --scan Scan for an embedded fdt in file
-h, --help Print this help and exit
-V, --version Print version and exit
本文采用s5pv21_smc.dtb文件为例说明fdtdump工具的使用。Linux终端执行fdtdump –sd s5pv21_smc.dtb > s5pv21_smc.txt,打开s5pv21_smc.txt文件,部分输出信息如下所示:
// magic: 0xd00dfeed
// totalsize: 0xce4 (3300)
// off_dt_struct: 0x38
// off_dt_strings: 0xc34
// off_mem_rsvmap: 0x28
// version: 17
// last_comp_version: 16
// boot_cpuid_phys: 0x0
// size_dt_strings: 0xb0
// size_dt_struct: 0xbfc
以上信息便是Device Tree文件头信息,存储在dtb文件的开头部分。在Linux内核中使用struct fdt_header结构体描述。struct fdt_header结构体定义在scripts\dtc\libfdt\fdt.h文件中。
struct fdt_header {
	fdt32_t magic;			     /* magic word FDT_MAGIC */
	fdt32_t totalsize;		     /* total size of DT block */
	fdt32_t off_dt_struct;		 /* offset to structure */
	fdt32_t off_dt_strings;		 /* offset to strings */
	fdt32_t off_mem_rsvmap;		 /* offset to memory reserve map */
	fdt32_t version;		         /* format version */
	fdt32_t last_comp_version;	 /* last compatible version */

	/* version 2 fields below */
	fdt32_t boot_cpuid_phys;	 /* Which physical CPU id we're booting on */
	/* version 3 fields below */
	fdt32_t size_dt_strings;	 /* size of the strings block */

	/* version 17 fields below */
	fdt32_t size_dt_struct;		 /* size of the structure block */
};
fdtdump工具的输出信息即是以上结构中每一个成员的值,struct fdt_header结构体包含了Device Tree的私有信息。例如: fdt_header.magic是fdt的魔数,固定值为0xd00dfeed,fdt_header.totalsize是fdt文件的大小。使用二进制工具打开s5pv21_smc.dtb验证。s5pv21_smc.dtb二进制文件头信息如下图所示。从下图中可以得到Device Tree的文件是以大端模式储存。并且,头部信息和fdtdump的输出信息一致。
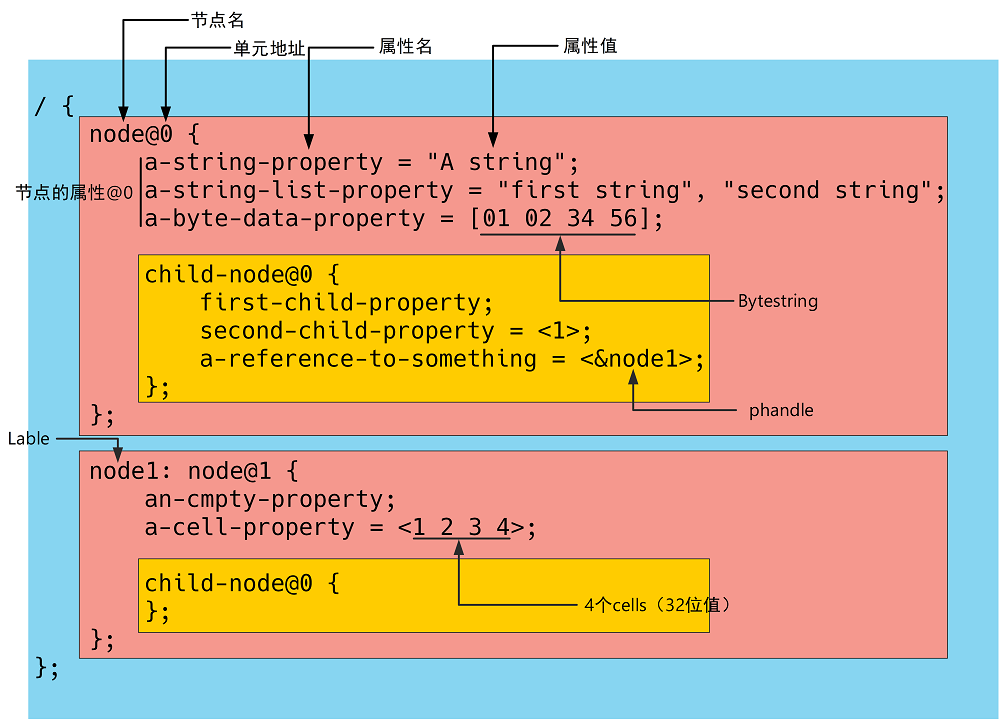
Device Tree中的节点信息举例如下图所示。

上述.dts文件并没有什么真实的用途,但它基本表征了一个Device Tree源文件的结构:
1个root结点"/";root结点下面含一系列子结点,本例中为"node@0"和"node@1";结点"node@0"下又含有一系列子结点,本例中为"child-node@0";各结点都有一系列属性。
这些属性可能为空,如" an-empty-property";可能为字符串,如"a-string-property";可能为字符串数组,如"a-string-list-property";可能为Cells(由u32整数组成),如"second-child-property",可能为二进制数,如"a-byte-data-property"。
Device Tree源文件的结构分为header、fill_area、dt_struct及dt_string四个区域。header为头信息,fill_area为填充区域,填充数字0,dt_struct存储节点数值及名称相关信息,dt_string存储属性名。例如:a-string-property就存储在dt_string区,"A string"及node1就存储在dt_struct区域。
我们可以给一个设备节点添加lable,之后可以通过&lable的形式访问这个lable,这种引用是通过phandle(pointer handle)进行的。例如,下图中的node1就是一个lable,node@0的子节点child-node@0通过&node1引用node@1节点。像是这种phandle的节点,在经过DTC工具编译之后,&node1会变成一个特殊的整型数字n,假设n值为1,那么在node@1节点下自动生成两个属性,属性如下:
linux,phandle = <0x00000001>;
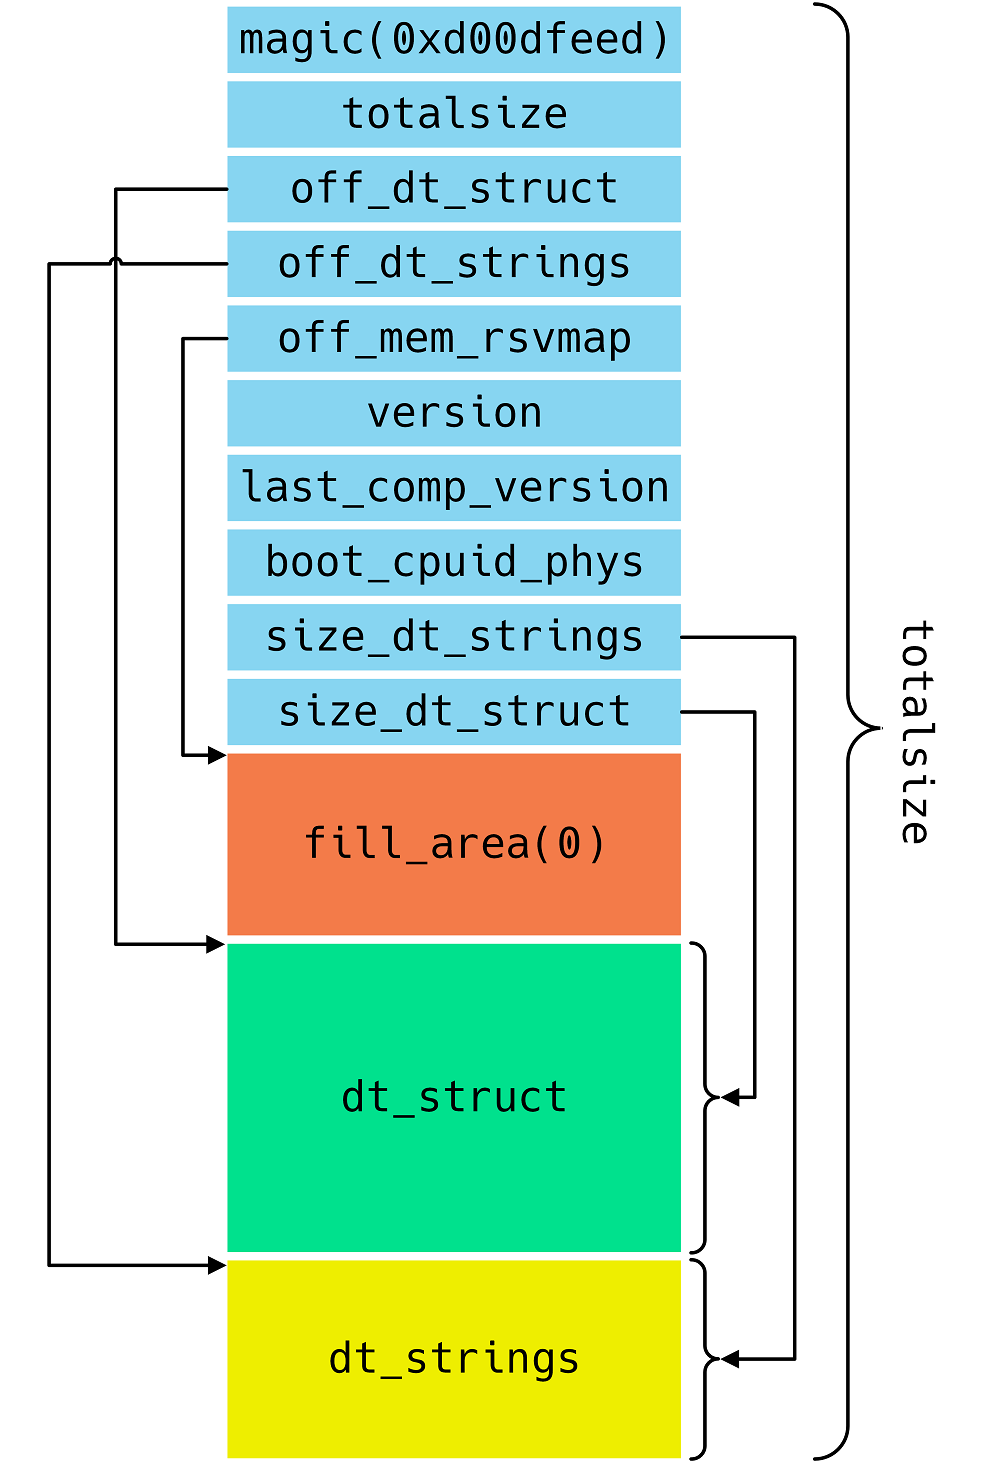
phandle = <0x00000001>;node@0的子节点child-node@0中的a-reference-to-something = <&node1>会变成a-reference-to-something = < 0x00000001>。此处0x00000001就是一个phandle得值,每一个phandle都有一个独一无二的整型值,在后续kernel中通过这个特殊的数字间接找到引用的节点。通过查看fdtdump输出信息以及dtb二进制文件信息,得到struct fdt_header和文件结构之间的关系信息如所示。
4. Device Tree文件结构
通过以上分析,可以得到Device Tree文件结构如下图所示。dtb的头部首先存放的是fdt_header的结构体信息,接着是填充区域,填充大小为off_dt_struct – sizeof(struct fdt_header),填充的值为0。接着就是struct fdt_property结构体的相关信息。最后是dt_string部分。
Device Tree源文件的结构分为header、fill_area、dt_struct及dt_string四个区域。fill_area区域填充数值0。节点(node)信息使用struct fdt_node_header结构体描述。属性信息使用struct fdt_property结构体描述。各个结构体信息如下:
struct fdt_node_header {
	fdt32_t tag;
	char name[0];
};

struct fdt_property {
	fdt32_t tag;
	fdt32_t len;
	fdt32_t nameoff;
	char data[0];
};
struct fdt_node_header描述节点信息,tag是标识node的起始结束等信息的标志位,name指向node名称的首地址。tag的取值如下:
#define FDT_BEGIN_NODE	0x1		/* Start node: full name */
#define FDT_END_NODE	0x2		/* End node */
#define FDT_PROP	      0x3		/* Property: name off, size, content */
#define FDT_NOP		0x4		/* nop */
#define FDT_END		0x9
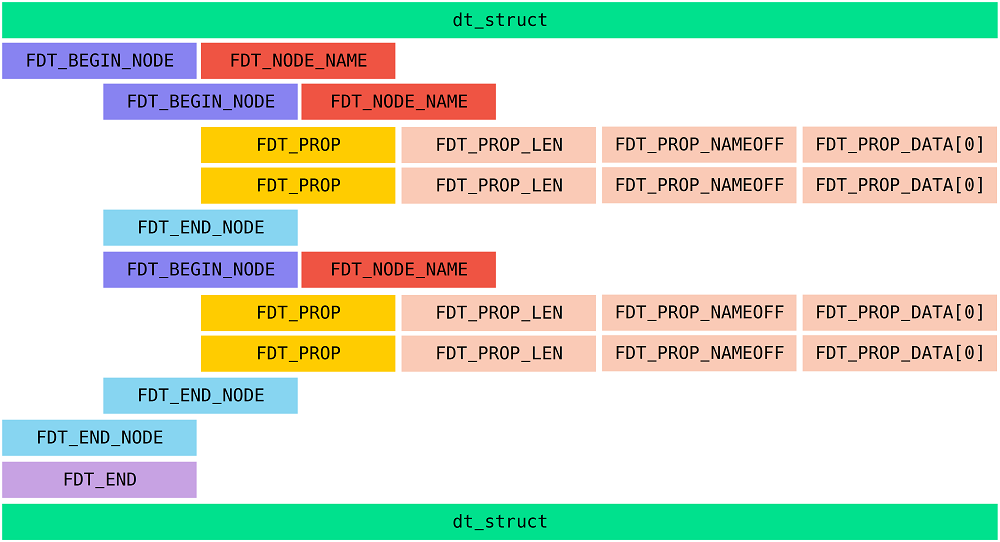
FDT_BEGIN_NODE和FDT_END_NODE标识node节点的起始和结束,FDT_PROP标识node节点下面的属性起始符,FDT_END标识Device Tree的结束标识符。因此,对于每个node节点的tag标识符一般为FDT_BEGIN_NODE,对于每个node节点下面的属性的tag标识符一般是FDT_PROP。
描述属性采用struct fdt_property描述,tag标识是属性,取值为FDT_PROP;len为属性值的长度(包括‘\0’,单位:字节);nameoff为属性名称存储位置相对于off_dt_strings的偏移地址。
例如:compatible = "samsung,goni", "samsung,s5pv210";compatible是属性名称,"samsung,goni", "samsung,s5pv210"是属性值。compatible属性名称字符串存放的区域是dt_string。"samsung,goni", "samsung,s5pv210"存放的位置是fdt_property.data后面。因此fdt_property.data指向该属性值。fdt_property.tag的值为属性标识,len为属性值的长度(包括‘\0’,单位:字节),此处len = 29。nameoff为compatible字符串的位置相对于off_dt_strings的偏移地址,即&compatible = nameoff + off_dt_strings。 dt_struct在Device Tree中的结构如下图所示。节点的嵌套也带来tag标识符的嵌套。
5. kernel解析Device Tree
Device Tree文件结构描述就以上struct fdt_header、struct fdt_node_header及struct fdt_property三个结构体描述。kernel会根据Device Tree的结构解析出kernel能够使用的struct property结构体。kernel根据Device Tree中所有的属性解析出数据填充struct property结构体。struct property结构体描述如下:
struct property {
	char *name;                          /* property full name */
	int length;                          /* property value length */
	void *value;                         /* property value */
	struct property *next;             /* next property under the same node */
	unsigned long _flags;
	unsigned int unique_id;
	struct bin_attribute attr;        /* 属性文件,与sysfs文件系统挂接 */
};
总的来说,kernel根据Device Tree的文件结构信息转换成struct property结构体,并将同一个node节点下面的所有属性通过property.next指针进行链接,形成一个单链表。
kernel中究竟是如何解析Device Tree的呢?下面分析函数解析过程。函数调用过程如下图所示。kernel的C语言阶段的入口函数是init/main.c/stsrt_kernel()函数,在early_init_dt_scan_nodes()中会做以下三件事:
(1) 扫描/chosen或者/chose@0节点下面的bootargs属性值到boot_command_line,此外,还处理initrd相关的property,并保存在initrd_start和initrd_end这两个全局变量中;
(2) 扫描根节点下面,获取{size,address}-cells信息,并保存在dt_root_size_cells和dt_root_addr_cells全局变量中;
(3) 扫描具有device_type = “memory”属性的/memory或者/memory@0节点下面的reg属性值,并把相关信息保存在meminfo中,全局变量meminfo保存了系统内存相关的信息。
Device Tree中的每一个node节点经过kernel处理都会生成一个struct device_node的结构体,struct device_node最终一般会被挂接到具体的struct device结构体。struct device_node结构体描述如下:
struct device_node {
	const char *name;              /* node的名称,取最后一次“/”和“@”之间子串 */
	const char *type;              /* device_type的属性名称,没有为<NULL> */
	phandle phandle;               /* phandle属性值 */
	const char *full_name;        /* 指向该结构体结束的位置,存放node的路径全名,例如:/chosen */
	struct fwnode_handle fwnode;

	struct	property *properties;  /* 指向该节点下的第一个属性,其他属性与该属性链表相接 */
	struct	property *deadprops;   /* removed properties */
	struct	device_node *parent;   /* 父节点 */
	struct	device_node *child;    /* 子节点 */
	struct	device_node *sibling;  /* 姊妹节点,与自己同等级的node */
	struct	kobject kobj;            /* sysfs文件系统目录体现 */
	unsigned long _flags;          /* 当前node状态标志位,见/include/linux/of.h line124-127 */
	void	*data;
};

/* flag descriptions (need to be visible even when !CONFIG_OF) */
#define OF_DYNAMIC        1 /* node and properties were allocated via kmalloc */
#define OF_DETACHED       2 /* node has been detached from the device tree*/
#define OF_POPULATED      3 /* device already created for the node */
#define OF_POPULATED_BUS 4 /* of_platform_populate recursed to children of this node */
struct device_node结构体中的每个成员作用已经备注了注释信息,下面分析以上信息是如何得来的。Device Tree的解析首先从unflatten_device_tree()开始,代码列出如下:
/**
 * unflatten_device_tree - create tree of device_nodes from flat blob
 *
 * unflattens the device-tree passed by the firmware, creating the
 * tree of struct device_node. It also fills the "name" and "type"
 * pointers of the nodes so the normal device-tree walking functions
 * can be used.
 */
void __init unflatten_device_tree(void)
{
	__unflatten_device_tree(initial_boot_params, &of_root,
				early_init_dt_alloc_memory_arch);

	/* Get pointer to "/chosen" and "/aliases" nodes for use everywhere */
	of_alias_scan(early_init_dt_alloc_memory_arch);
}

/**
 * __unflatten_device_tree - create tree of device_nodes from flat blob
 *
 * unflattens a device-tree, creating the
 * tree of struct device_node. It also fills the "name" and "type"
 * pointers of the nodes so the normal device-tree walking functions
 * can be used.
 * @blob: The blob to expand
 * @mynodes: The device_node tree created by the call
 * @dt_alloc: An allocator that provides a virtual address to memory
 * for the resulting tree
 */
static void __unflatten_device_tree(const void *blob,
			     struct device_node **mynodes,
			     void * (*dt_alloc)(u64 size, u64 align))
{
	unsigned long size;
	int start;
	void *mem;

    /* 省略部分不重要部分 */
	/* First pass, scan for size */
	start = 0;
	size = (unsigned long)unflatten_dt_node(blob, NULL, &start, NULL, NULL, 0, true);
	size = ALIGN(size, 4);

	/* Allocate memory for the expanded device tree */
	mem = dt_alloc(size + 4, __alignof__(struct device_node));
	memset(mem, 0, size);

	/* Second pass, do actual unflattening */
	start = 0;
	unflatten_dt_node(blob, mem, &start, NULL, mynodes, 0, false);
}
分析以上代码,在unflatten_device_tree()中,调用函数__unflatten_device_tree(),参数initial_boot_params指向Device Tree在内存中的首地址,of_root在经过该函数处理之后,会指向根节点,early_init_dt_alloc_memory_arch是一个函数指针,为struct device_node和struct property结构体分配内存的回调函数(callback)。在__unflatten_device_tree()函数中,两次调用unflatten_dt_node()函数,第一次是为了得到Device Tree转换成struct device_node和struct property结构体需要分配的内存大小,第二次调用才是具体填充每一个struct device_node和struct property结构体。unflatten_dt_node()代码列出如下:
/**
 * unflatten_dt_node - Alloc and populate a device_node from the flat tree
 * @blob: The parent device tree blob
 * @mem: Memory chunk to use for allocating device nodes and properties
 * @poffset: pointer to node in flat tree
 * @dad: Parent struct device_node
 * @nodepp: The device_node tree created by the call
 * @fpsize: Size of the node path up at the current depth.
 * @dryrun: If true, do not allocate device nodes but still calculate needed
 * memory size
 */
static void * unflatten_dt_node(const void *blob,
				void *mem,
				int *poffset,
				struct device_node *dad,
				struct device_node **nodepp,
				unsigned long fpsize,
				bool dryrun)
{
	const __be32 *p;
	struct device_node *np;
	struct property *pp, **prev_pp = NULL;
	const char *pathp;
	unsigned int l, allocl;
	static int depth;
	int old_depth;
	int offset;
	int has_name = 0;
	int new_format = 0;

	/* 获取node节点的name指针到pathp中 */
	pathp = fdt_get_name(blob, *poffset, &l);
	if (!pathp)
		return mem;

	allocl = ++l;

	/* version 0x10 has a more compact unit name here instead of the full
	 * path. we accumulate the full path size using "fpsize", we'll rebuild
	 * it later. We detect this because the first character of the name is
	 * not '/'.
	 */
	if ((*pathp) != '/') {
		new_format = 1;
		if (fpsize == 0) {
			/* root node: special case. fpsize accounts for path
			 * plus terminating zero. root node only has '/', so
			 * fpsize should be 2, but we want to avoid the first
			 * level nodes to have two '/' so we use fpsize 1 here
			 */
			fpsize = 1;
			allocl = 2;
			l = 1;
			pathp = "";
		} else {
			/* account for '/' and path size minus terminal 0
			 * already in 'l'
			 */
			fpsize += l;
			allocl = fpsize;
		}
	}

	/* 分配struct device_node内存,包括路径全称大小 */
	np = unflatten_dt_alloc(&mem, sizeof(struct device_node) + allocl,
				__alignof__(struct device_node));
	if (!dryrun) {
		char *fn;
		of_node_init(np);

		/* 填充full_name,full_name指向该node节点的全路径名称字符串 */
		np->full_name = fn = ((char *)np) + sizeof(*np);
		if (new_format) {
			/* rebuild full path for new format */
			if (dad && dad->parent) {
				strcpy(fn, dad->full_name);
				fn += strlen(fn);
			}
			*(fn++) = '/';
		}
		memcpy(fn, pathp, l);

		/* 节点挂接到相应的父节点、子节点和姊妹节点 */
		prev_pp = &np->properties;
		if (dad != NULL) {
			np->parent = dad;
			np->sibling = dad->child;
			dad->child = np;
		}
	}
	/* 处理该node节点下面所有的property */
	for (offset = fdt_first_property_offset(blob, *poffset);
	     (offset >= 0);
	     (offset = fdt_next_property_offset(blob, offset))) {
		const char *pname;
		u32 sz;

		if (!(p = fdt_getprop_by_offset(blob, offset, &pname, &sz))) {
			offset = -FDT_ERR_INTERNAL;
			break;
		}

		if (pname == NULL) {
			pr_info("Can't find property name in list !\n");
			break;
		}
		if (strcmp(pname, "name") == 0)
			has_name = 1;
		pp = unflatten_dt_alloc(&mem, sizeof(struct property),
					__alignof__(struct property));
		if (!dryrun) {
			/* We accept flattened tree phandles either in
			 * ePAPR-style "phandle" properties, or the
			 * legacy "linux,phandle" properties.  If both
			 * appear and have different values, things
			 * will get weird.  Don't do that. */

			/* 处理phandle,得到phandle值 */
			if ((strcmp(pname, "phandle") == 0) ||
			    (strcmp(pname, "linux,phandle") == 0)) {
				if (np->phandle == 0)
					np->phandle = be32_to_cpup(p);
			}
			/* And we process the "ibm,phandle" property
			 * used in pSeries dynamic device tree
			 * stuff */
			if (strcmp(pname, "ibm,phandle") == 0)
				np->phandle = be32_to_cpup(p);
			pp->name = (char *)pname;
			pp->length = sz;
			pp->value = (__be32 *)p;
			*prev_pp = pp;
			prev_pp = &pp->next;
		}
	}
	/* with version 0x10 we may not have the name property, recreate
	 * it here from the unit name if absent
	 */
	/* 为每个node节点添加一个name的属性 */
	if (!has_name) {
		const char *p1 = pathp, *ps = pathp, *pa = NULL;
		int sz;

		/* 属性name的value值为node节点的名称,取“/”和“@”之间的子串 */
		while (*p1) {
			if ((*p1) == '@')
				pa = p1;
			if ((*p1) == '/')
				ps = p1 + 1;
			p1++;
		}
		if (pa < ps)
			pa = p1;
		sz = (pa - ps) + 1;
		pp = unflatten_dt_alloc(&mem, sizeof(struct property) + sz,
					__alignof__(struct property));
		if (!dryrun) {
			pp->name = "name";
			pp->length = sz;
			pp->value = pp + 1;
			*prev_pp = pp;
			prev_pp = &pp->next;
			memcpy(pp->value, ps, sz - 1);
			((char *)pp->value)[sz - 1] = 0;
		}
	}
	/* 填充device_node结构体中的name和type成员 */
	if (!dryrun) {
		*prev_pp = NULL;
		np->name = of_get_property(np, "name", NULL);
		np->type = of_get_property(np, "device_type", NULL);

		if (!np->name)
			np->name = "<NULL>";
		if (!np->type)
			np->type = "<NULL>";
	}

	old_depth = depth;
	*poffset = fdt_next_node(blob, *poffset, &depth);
	if (depth < 0)
		depth = 0;
	/* 递归调用node节点下面的子节点 */
	while (*poffset > 0 && depth > old_depth)
		mem = unflatten_dt_node(blob, mem, poffset, np, NULL,
					fpsize, dryrun);

	if (*poffset < 0 && *poffset != -FDT_ERR_NOTFOUND)
		pr_err("unflatten: error %d processing FDT\n", *poffset);

	/*
	 * Reverse the child list. Some drivers assumes node order matches .dts
	 * node order
	 */
	if (!dryrun && np->child) {
		struct device_node *child = np->child;
		np->child = NULL;
		while (child) {
			struct device_node *next = child->sibling;
			child->sibling = np->child;
			np->child = child;
			child = next;
		}
	}

	if (nodepp)
		*nodepp = np;

	return mem;
}
通过以上函数处理就得到了所有的struct device_node结构体,为每一个node都会自动添加一个名称为“name”的property,property.length的值为当前node的名称取最后一个“/”和“@”之间的子串(包括‘\0’)。例如:/serial@e2900800,则length = 7,property.value = device_node.name = “serial”。
6. platform_device和device_node绑定
经过以上解析,Device Tree的数据已经全部解析出具体的struct device_node和struct property结构体,下面需要和具体的device进行绑定。首先讲解platform_device和device_node的绑定过程。在arch/arm/kernel/setup.c文件中,customize_machine()函数负责填充struct platform_device结构体。函数调用过程如下图所示。
代码分析如下:
const struct of_device_id of_default_bus_match_table[] = {
	{ .compatible = "simple-bus", },
	{ .compatible = "simple-mfd", },
#ifdef CONFIG_ARM_AMBA
	{ .compatible = "arm,amba-bus", },
#endif /* CONFIG_ARM_AMBA */
	{} /* Empty terminated list */
};

int of_platform_populate(struct device_node *root,
			const struct of_device_id *matches,
			const struct of_dev_auxdata *lookup,
			struct device *parent)
{
	struct device_node *child;
	int rc = 0;

	/* 获取根节点 */
	root = root ? of_node_get(root) : of_find_node_by_path("/");
	if (!root)
		return -EINVAL;

	/* 为根节点下面的每一个节点创建platform_device结构体 */
	for_each_child_of_node(root, child) {
		rc = of_platform_bus_create(child, matches, lookup, parent, true);
		if (rc) {
			of_node_put(child);
			break;
		}
	}
	/* 更新device_node flag标志位 */
	of_node_set_flag(root, OF_POPULATED_BUS);

	of_node_put(root);
	return rc;
}

static int of_platform_bus_create(struct device_node *bus,
				  const struct of_device_id *matches,
				  const struct of_dev_auxdata *lookup,
				  struct device *parent, bool strict)
{
	const struct of_dev_auxdata *auxdata;
	struct device_node *child;
	struct platform_device *dev;
	const char *bus_id = NULL;
	void *platform_data = NULL;
	int rc = 0;

	/* 只有包含"compatible"属性的node节点才会生成相应的platform_device结构体 */
	/* Make sure it has a compatible property */
	if (strict && (!of_get_property(bus, "compatible", NULL))) {
		return 0;
	}
	/* 省略部分代码 */
	/*
	 * 针对节点下面得到status = "ok" 或者status = "okay"或者不存在status属性的
	 * 节点分配内存并填充platform_device结构体
	 */
	dev = of_platform_device_create_pdata(bus, bus_id, platform_data, parent);
	if (!dev || !of_match_node(matches, bus))
		return 0;

	/* 递归调用节点解析函数,为子节点继续生成platform_device结构体,前提是父节点
	 * 的“compatible” = “simple-bus”,也就是匹配of_default_bus_match_table结构体中的数据
	 */
	for_each_child_of_node(bus, child) {
		rc = of_platform_bus_create(child, matches, lookup, &dev->dev, strict);
		if (rc) {
			of_node_put(child);
			break;
		}
	}
	of_node_set_flag(bus, OF_POPULATED_BUS);
	return rc;
}
总的来说,当of_platform_populate()函数执行完毕,kernel就为DTB中所有包含compatible属性名的第一级node创建platform_device结构体,并向平台设备总线注册设备信息。如果第一级node的compatible属性值等于“simple-bus”、“simple-mfd”或者"arm,amba-bus"的话,kernel会继续为当前node的第二级包含compatible属性的node创建platform_device结构体,并注册设备。Linux系统下的设备大多都是挂载在平台总线下的,因此在平台总线被注册后,会根据of_root节点的树结构,去寻找该总线的子节点,所有的子节点将被作为设备注册到该总线上。
7. i2c_client和device_node绑定
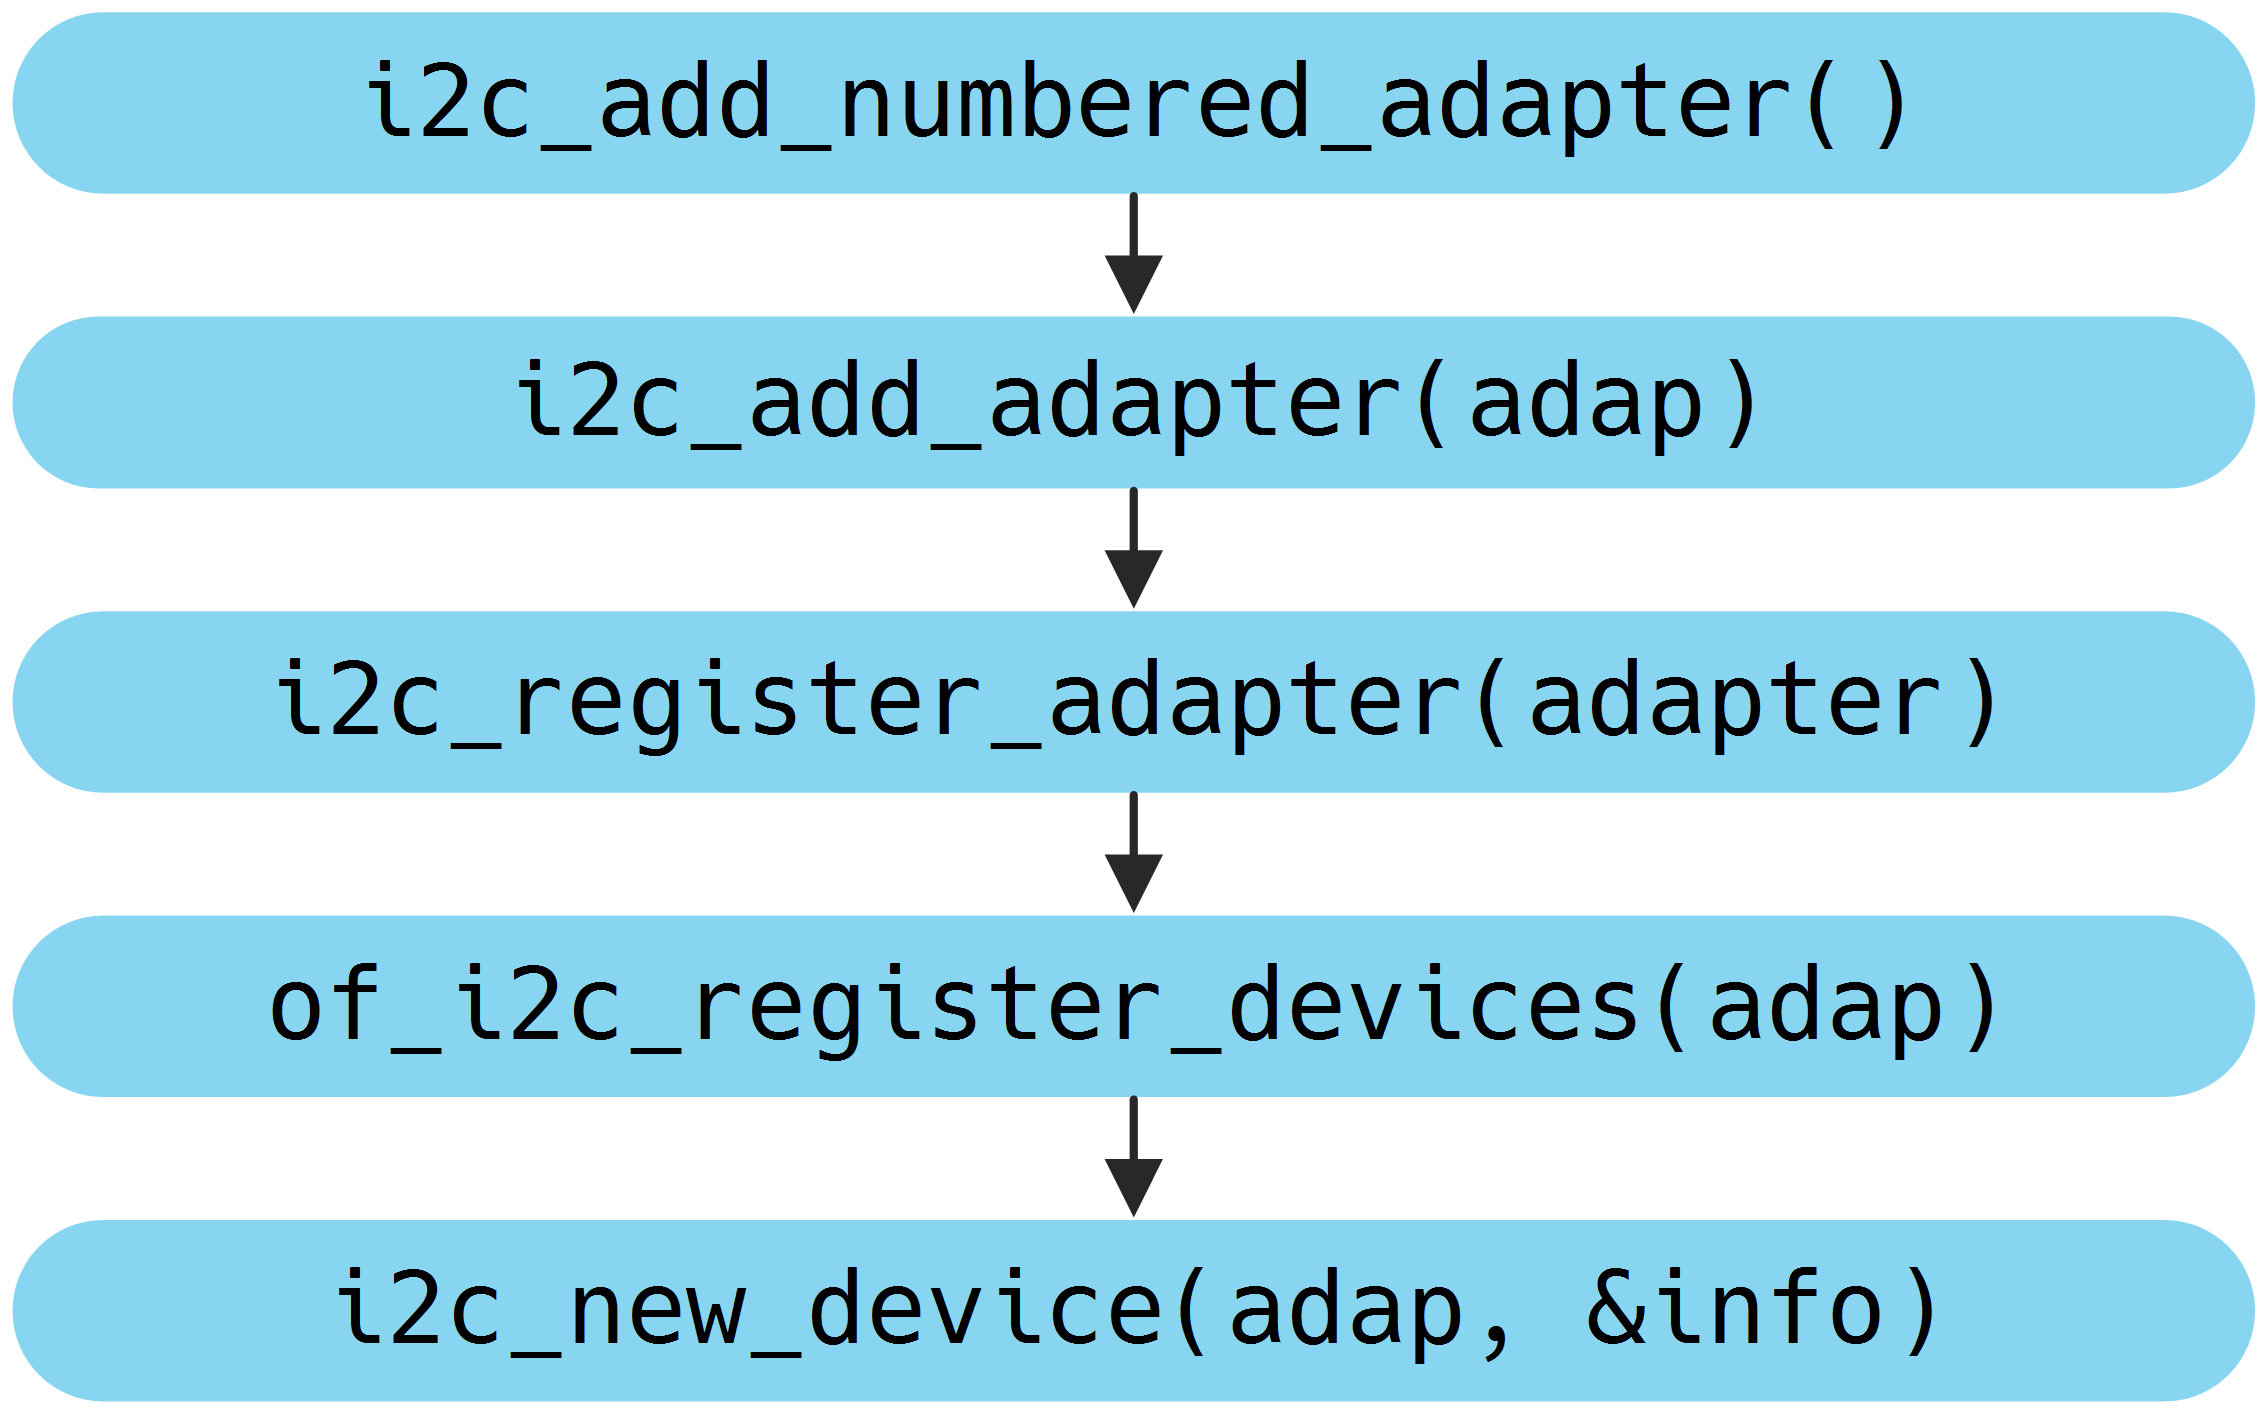
经过customize_machine()函数的初始化,DTB已经转换成platform_device结构体,这其中就包含i2c adapter设备,不同的SoC需要通过平台设备总线的方式自己实现i2c adapter设备的驱动。例如:i2c_adapter驱动的probe函数中会调用i2c_add_numbered_adapter()注册adapter驱动,函数流执行如下图所示。
在of_i2c_register_devices()函数内部便利i2c节点下面的每一个子节点,并为子节点(status = “disable”的除外)创建i2c_client结构体,并与子节点的device_node挂接。其中i2c_client的填充是在i2c_new_device()中进行的,最后device_register()。在构建i2c_client的时候,会对node下面的compatible属性名称的厂商名字去除作为i2c_client的name。例如:compatible = “maxim,ds1338”,则i2c_client->name = “ds1338”。
8. Device_Tree与sysfs
kernel启动流程为start_kernel()→rest_init()→kernel_thread():kernel_init()→do_basic_setup()→driver_init()→of_core_init(),在of_core_init()函数中在sys/firmware/devicetree/base目录下面为设备树展开成sysfs的目录和二进制属性文件,所有的node节点就是一个目录,所有的property属性就是一个二进制属性文件。
原创文章,转发请注明出处。蜗窝科技,www.wowotech.net。
标签: 设备树
评论:
2020-10-22 15:05
linux,phandle = <0x00000001>;
phandle = <0x00000001>;
使用fdtdump dump之后发现只添加了phandle = <0x00000001>这一条property;没有linux,phandle = <0x00000001>;这个property
2020-01-20 11:16
有个地方需要交流一下哈,i2c_adapter是依赖于i2c platform_driver的probe函数创建的,i2c_adapter本身是注册在i2c_bus上的,没有在platform_bus上注册设备驱动,并且没有在i2c_bus上注册相应的驱动(i2c_core.c中的i2c_device_probe()有一条判断if (!client) return 0;说明不需要为i2c_adapter匹配驱动),厂商只需要实现i2c_adapter的i2c_algorithm方法,通过i2c_client->adapter访问i2c_adapter就能实现i2c协议的数据传输。
功能
最新评论
- 鲁班七号
2025年转行linux 考古来了。文章一看就懂了不少。点... - wangyongrui
设备树没写频率的情况下,寄存器CNTFRQ里的值是谁写进去的... - wangjing
写得太好了 - wangjing
写得太好了! - DRAM
圖面都沒辦法顯示出來好像掛點了。 - Simbr
bus至少是不是还有个subsystem?
文章分类
随机文章
文章存档
- 2025年4月(5)
- 2024年2月(1)
- 2023年5月(1)
- 2022年10月(1)
- 2022年8月(1)
- 2022年6月(1)
- 2022年5月(1)
- 2022年4月(2)
- 2022年2月(2)
- 2021年12月(1)
- 2021年11月(5)
- 2021年7月(1)
- 2021年6月(1)
- 2021年5月(3)
- 2020年3月(3)
- 2020年2月(2)
- 2020年1月(3)
- 2019年12月(3)
- 2019年5月(4)
- 2019年3月(1)
- 2019年1月(3)
- 2018年12月(2)
- 2018年11月(1)
- 2018年10月(2)
- 2018年8月(1)
- 2018年6月(1)
- 2018年5月(1)
- 2018年4月(7)
- 2018年2月(4)
- 2018年1月(5)
- 2017年12月(2)
- 2017年11月(2)
- 2017年10月(1)
- 2017年9月(5)
- 2017年8月(4)
- 2017年7月(4)
- 2017年6月(3)
- 2017年5月(3)
- 2017年4月(1)
- 2017年3月(8)
- 2017年2月(6)
- 2017年1月(5)
- 2016年12月(6)
- 2016年11月(11)
- 2016年10月(9)
- 2016年9月(6)
- 2016年8月(9)
- 2016年7月(5)
- 2016年6月(8)
- 2016年5月(8)
- 2016年4月(7)
- 2016年3月(5)
- 2016年2月(5)
- 2016年1月(6)
- 2015年12月(6)
- 2015年11月(9)
- 2015年10月(9)
- 2015年9月(4)
- 2015年8月(3)
- 2015年7月(7)
- 2015年6月(3)
- 2015年5月(6)
- 2015年4月(9)
- 2015年3月(9)
- 2015年2月(6)
- 2015年1月(6)
- 2014年12月(17)
- 2014年11月(8)
- 2014年10月(9)
- 2014年9月(7)
- 2014年8月(12)
- 2014年7月(6)
- 2014年6月(6)
- 2014年5月(9)
- 2014年4月(9)
- 2014年3月(7)
- 2014年2月(3)
- 2014年1月(4)


2024-07-31 10:51